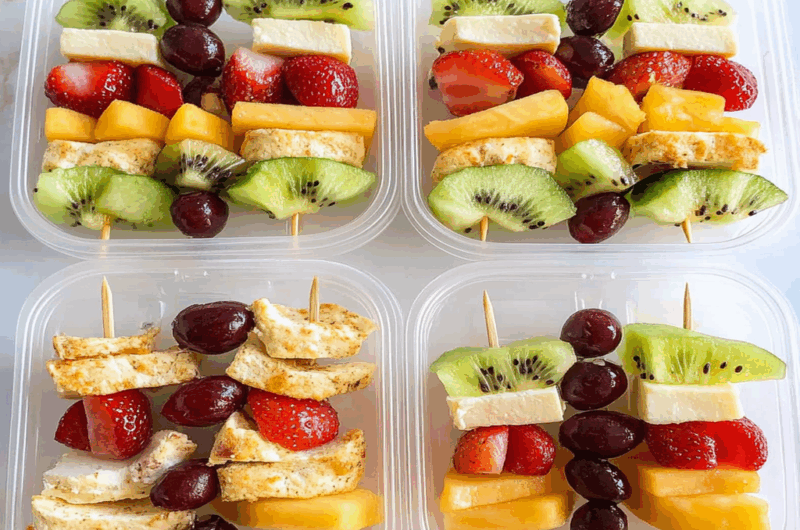
Lunch box cheese and fruit skewers are the perfect blend of cheesy goodness and fruity freshness, making lunch a little more exciting. Picture this: you open your lunch box to a rainbow of colors, delightful textures, and mouth-watering aromas that make your taste buds do a happy dance. For more inspiration, check out this mushroom Swiss cheese meatloaf recipe.
Now, I know what you’re thinking—what could possibly be better than a monotonous sandwich? Well, let me tell you, these skewers pack a punch of flavor that transforms your midday meal into a mini celebration. Whether you’re at work, school, or just lounging at home, these skewers will make you feel like you’re at a fancy picnic while seated at your desk.
Why You'll Love This Recipe
- These lunch box cheese and fruit skewers are super easy to prepare and require minimal kitchen skills.
- The delightful mix of flavors will have everyone asking for seconds.
- Their vibrant colors make them an eye-catching addition to any lunchbox.
- Plus, they are versatile enough to cater to any palate or occasion!
Ingredients for Lunch box cheese and fruit skewers
Here’s what you’ll need to make this delicious dish:
- Cheese Cubes: Choose your favorite cheese like cheddar or mozzarella for creaminess and flavor; they’re the stars of the show!
- Fresh Fruits: Use seasonal fruits such as grapes, strawberries, or pineapple; they add sweetness and brightness to every bite.
- Skewers: Wooden or reusable metal skewers work best; they hold everything together and give that lovely presentation.
- Optional Garnishes: Consider adding herbs like mint or basil for extra flavor; they elevate the dish’s aesthetic appeal.
The full ingredients list, including measurements, is provided in the recipe card directly below.
How to Make Lunch box cheese and fruit skewers
Follow these simple steps to prepare this delicious dish:
Step 1: Gather Your Ingredients
Start by collecting all your ingredients—the cheese cubes, fresh fruits, and skewers. peach tart with almond cream Set up your workspace with a cutting board and knife for easy assembly. peach burrata crostini.
Step 2: Prepare the Fruits
Wash your fruits thoroughly. If you’re using larger pieces like pineapple or apples, chop them into bite-sized chunks that will easily fit on the skewer.
Step 3: Assemble the Skewers
Grab a skewer and begin by threading on a cheese cube followed by a piece of fruit. Alternate between cheese and fruit until you’ve got a colorful array that looks like it jumped out of a food magazine!
Step 4: Secure the Ends
Make sure to leave some space at both ends of the skewer for easy handling. You don’t want anyone poking their eye out during lunchtime!
Step 5: Chill (Optional)
If you have time, pop those skewers in the fridge for about 15 minutes before serving. This makes them refreshingly cool—perfect for hot summer days.
Step 6: Serve with Style
Arrange your completed skewers on a platter or place them back into your lunch box. Feel free to add dips like yogurt or honey on the side for extra indulgence!
Transfer to plates and watch as everyone marvels at your culinary masterpiece! These lunch box cheese and fruit skewers aren’t just food; they’re an experience waiting to happen!
You Must Know
- These lunch box cheese and fruit skewers are not only a delightful treat but also a canvas for creativity.
- You can mix and match your favorite cheeses and fruits, making lunchtime an exciting adventure.
- They are perfect for picnics, school lunches, or simply snacking at home.
Perfecting the Cooking Process
Start by prepping all your ingredients first. Cut the cheese and fruit into bite-sized pieces, then assemble the skewers in a colorful pattern. This way, each skewer becomes a mini work of art that’s as fun to make as it is to eat.
Add Your Touch
Feel free to swap out cheeses and fruits based on what you love or have on hand. Try adding nuts or even some chocolate for a sweet twist. Dipping sauces like honey or yogurt can elevate your lunch box cheese and fruit skewers even more!
Storing & Reheating
Store any leftover skewers in an airtight container in the fridge for up to three days. If you want to enjoy them warm, pop them in the microwave for a few seconds—just be careful not to overdo it!
Chef's Helpful Tips
- Use firm fruits like apples or grapes for better stability on the skewers.
- Avoid overly ripe fruits that can squish easily.
- Have fun with different cheese types; sharp cheddar and creamy brie create great flavor contrasts!
I once made these lunch box cheese and fruit skewers for a picnic with friends, and they disappeared faster than I could say “skewer.” Everyone loved how colorful and fun they were—it turned out to be a lunchtime hit! For more inspiration, check out this baked apples with feta recipe.
FAQs
What ingredients do I need for lunch box cheese and fruit skewers?
To make lunch box cheese and fruit skewers, you will need a variety of cheeses like cheddar, mozzarella, or gouda. Fresh fruits such as grapes, strawberries, and pineapple work well. Additionally, you’ll need wooden or bamboo skewers to assemble the ingredients. Feel free to include vegetables like cherry tomatoes or cucumber for added variety. Having a mix of flavors and textures will make your skewers more appealing and nutritious.
How can I store lunch box cheese and fruit skewers?
To store lunch box cheese and fruit skewers, place them in an airtight container. It’s best to keep them refrigerated until you’re ready to pack them for lunch. If possible, separate the cheese from moist fruits to prevent sogginess. Cover the container with a lid to maintain freshness. Proper storage will keep your skewers tasty for up to two days, ensuring they remain a delightful addition to your lunch.
Can I customize my lunch box cheese and fruit skewers?
Absolutely! One of the best features of lunch box cheese and fruit skewers is their versatility. You can easily customize them by selecting your favorite cheeses and seasonal fruits. Add nuts or olives for extra flavor, or even incorporate deli meats like salami for a heartier option. The combinations are endless, allowing you to create unique skewers that suit your taste preferences or dietary restrictions.
Are lunch box cheese and fruit skewers healthy?
Yes, lunch box cheese and fruit skewers can be quite healthy! They provide a balanced mix of protein from the cheese, vitamins from the fruits, and fiber for digestion. Choosing low-fat cheese options can help reduce calorie intake while still providing essential nutrients. healthy overnight oats Pairing these with whole-grain crackers can also enhance their nutritional value, making them an excellent choice for a balanced meal or snack.
Conclusion for Lunch box cheese and fruit skewers
Lunch box cheese and fruit skewers are not only easy to prepare but also offer great nutritional benefits. By combining various cheeses with fresh fruits, you create a delightful snack perfect for any lunchbox. Customize your skewers with different ingredients to keep things interesting while enjoying their health benefits. With proper storage methods, these tasty treats can stay fresh for days. Try making these fun skewers today; they’re sure to be a hit!
Lunch Box Cheese and Fruit Skewers
- Total Time: 10 minutes
- Yield: 4 servings (8 skewers) 1x
Description
Lunch box cheese and fruit skewers are a delightful way to brighten up any meal. Combining creamy cheese with fresh, juicy fruits, these colorful skewers are perfect for school lunches, picnics, or healthy snacking at home. Easy to customize with your favorite ingredients, they transform ordinary lunchtime into an exciting culinary experience that’s as fun to make as it is to eat.
Ingredients
- 1 cup cheddar cheese cubes (about 8 oz)
- 1 cup fresh strawberries, hulled and halved
- 1 cup grapes (red or green)
- 1 cup pineapple chunks
- 8 wooden skewers
Instructions
- Gather all ingredients: cheese cubes, strawberries, grapes, and pineapple.
- Wash the fruits thoroughly. Cut larger fruits into bite-sized pieces.
- On each skewer, thread one cheese cube followed by a piece of fruit; alternate until the skewer is filled.
- Leave space at both ends of the skewer for easy handling.
- For extra refreshment, chill the skewers in the fridge for about 15 minutes before serving.
- Prep Time: 10 minutes
- Cook Time: 0 minutes
- Category: Snack
- Method: No-cook
- Cuisine: American
Nutrition
- Serving Size: 2 skewers (approximately 80g)
- Calories: 150
- Sugar: 10g
- Sodium: 280mg
- Fat: 9g
- Saturated Fat: 5g
- Unsaturated Fat: 4g
- Trans Fat: 0g
- Carbohydrates: 14g
- Fiber: 2g
- Protein: 6g
- Cholesterol: 25mg