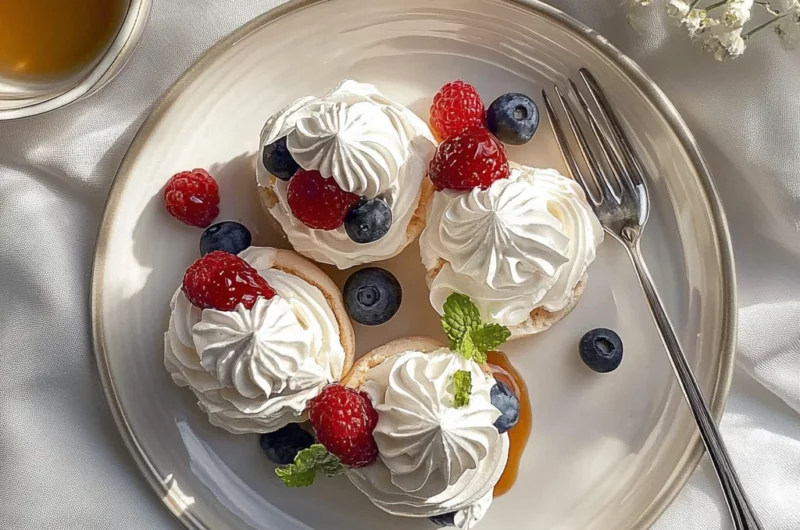
Imagine sinking your spoon into a cloud-like Mini Pavlova, where the delicate crispiness of the meringue meets a luscious dollop of whipped cream, topped with vibrant fruits bursting with sweetness. The aroma wafts through the air, transporting you to sun-drenched picnics and festive gatherings, where each bite feels like a celebration of joy and togetherness.
These delightful treats are not just desserts; they’re little bites of nostalgia that remind us of carefree summer afternoons spent with loved ones. Whether it’s a birthday party or a casual backyard barbecue, Mini Pavlovas promise an explosion of flavor that will leave everyone eagerly asking for seconds, all while evoking smiles and laughter around the table.
Why are Mini Pavlovas a must-try?
Delightfully unique in their airy texture, these mini pavlovas are a showstopper!
Quick and easy to whip up, they save you time in the kitchen without sacrificing flavor.
Versatile toppings allow for endless combinations, catering to all tastes—from fresh fruits to rich chocolate.
Perfect for gatherings, their individual servings make them a crowd favorite that’s sure to impress!
Mini Pavlovas Ingredients
For the Meringue
- Egg whites – use room temperature for better volume.
- Granulated sugar – ensures a sweet, crisp texture; avoid powdered sugar as it can make them too soft.
- Cornstarch – helps to create that delightful chewy center while keeping the outside crisp.
- White vinegar – stabilizes the meringue; lemon juice can be used as a substitute if needed.
For the Topping
- Heavy cream – whip until soft peaks form for a luscious finish; you can substitute with coconut cream for a dairy-free option.
- Fresh berries – strawberries, blueberries, or raspberries add a burst of flavor; feel free to mix and match your favorites!
- Mint leaves – these bring a refreshing touch and elevate the presentation of your mini pavlovas.
Enjoy creating these delightful mini pavlovas, perfect for any special occasion or just because!
How to Make Mini Pavlovas
1. Preheat your oven to 250°F (120°C). This low temperature is essential for creating the perfect crispy exterior while keeping the inside soft and marshmallow-like.
2. Whip egg whites in a large bowl until stiff peaks form. This may take about 5-7 minutes using an electric mixer, so keep whipping until you achieve that glossy texture.
3. Gradually add sugar, one tablespoon at a time. Continue mixing on high speed until the mixture becomes glossy and the sugar is fully dissolved; this should take another 5 minutes.
4. Fold in cornstarch and vinegar gently with a spatula. This step is crucial for achieving that delicate texture inside your mini pavlovas.
5. Spoon the meringue mixture onto a baking sheet lined with parchment paper. Create small nests or rounds, about 3 inches wide, making sure to leave space between each one for expansion.
6. Bake for 1 hour or until the pavlovas are dry to the touch and have a pale color. Turn off the oven and let them cool inside with the door slightly ajar; this helps prevent cracking.
7. Prepare your favorite toppings while they cool! Fresh whipped cream and vibrant fruits like berries or kiwi work beautifully atop these delightful mini pavlovas.
Optional: Drizzle with chocolate sauce for an extra decadent touch!
Exact quantities are listed in the recipe card below.
Tips for the Best Mini Pavlovas
- Egg Whites Matter: Ensure your egg whites are at room temperature; this helps achieve maximum volume and stability for your mini pavlovas.
- Gradual Sugar Addition: Add sugar slowly while whipping; this prevents graininess in the meringue, giving your mini pavlovas that smooth, glossy finish.
- Avoid Humidity: Make these on a dry day! Humidity can make it difficult for the meringue to set properly, leading to soggy pavlovas.
- Perfect Baking Time: Bake at a low temperature until crisp on the outside but still soft inside; overbaking can turn them into hard shells.
- Cool Completely: Let your mini pavlovas cool in the oven after baking. This prevents cracks and ensures they’re light and airy, just as they should be.
How to Store and Freeze Mini Pavlovas

Room Temperature: Keep your mini pavlovas in an airtight container for up to 3 days. This will help maintain their crisp texture while preventing any moisture from ruining them.
Fridge: If you need to store them longer, place the mini pavlovas in the fridge, but they should be consumed within 2 days for optimal taste and texture.
Freezer: To freeze mini pavlovas, wrap each one individually in plastic wrap and then place them in a freezer-safe bag. They’ll stay fresh for up to 1 month.
Reheating: When ready to enjoy, simply let the mini pavlovas come to room temperature. Avoid using the oven, as this can affect their delicate texture.
Mini Pavlovas Your Way
Unleash your creativity and delight in the process of crafting these airy delights tailored to your taste buds.
- Dairy-Free: Substitute whipped coconut cream for traditional cream for a luscious, vegan-friendly topping. The tropical flavor adds a lovely twist!
- Chocolate Drizzle: Melt dark chocolate and drizzle it over the pavlovas for a decadent finish. The rich, bittersweet contrast elevates each bite beautifully.
- Citrus Zest: Add lemon or orange zest to your meringue mixture for a zesty kick. This brightens the sweet flavors and adds an aromatic flair.
- Nutty Crunch: Top with chopped pistachios or hazelnuts for added texture. The crunch complements the soft meringue perfectly, creating a delightful textural experience.
- Spicy Sweetness: Sprinkle a pinch of cayenne pepper on the cream for a surprising heat. This subtle spice will wake up your palate in an exciting way!
- Seasonal Fruits: Swap out berries for seasonal fruits like peaches or figs. Each season brings its own sweetness, providing a fresh touch all year round.
- Flavored Meringue: Infuse your meringue with vanilla bean, almond extract, or rose water. These flavors deepen the complexity and make each mini pavlova uniquely yours.
- Savory Twist: Experiment with savory toppings like whipped feta and roasted tomatoes for an unexpected appetizer. This unique spin is sure to impress at gatherings!
Make Ahead Options
Mini Pavlovas are the perfect treat for meal prep, allowing you to enjoy a delightful dessert without the last-minute rush. To save time, you can prepare the meringue bases up to 24 hours in advance. Simply whip your egg whites and sugar until stiff peaks form, then pipe them into small nests on a parchment-lined baking sheet. Once baked and completely cooled, store them in an airtight container at room temperature for up to three days. For the best quality, avoid adding toppings until you’re ready to serve; this keeps the meringues crunchy. When it’s time to impress your guests, simply top each Mini Pavlova with whipped cream and fresh fruits for a stunning finish!
Mini Pavlovas Recipe FAQs
How do I choose the right eggs for my Mini Pavlovas?
Fresh, room-temperature eggs are essential for achieving the perfect meringue texture. Look for eggs that are at least a week old; their whites will whip up fluffier and more stable than fresher ones. If you can, opt for organic or free-range eggs to enhance the flavor.
What is the best way to store Mini Pavlovas?
Store your Mini Pavlovas in an airtight container at room temperature for up to 2 days. Avoid refrigeration, as humidity can make them lose their delightful crispness. If you need to keep them longer, consider storing the unfilled meringues separately from toppings until ready to serve.
Can I freeze Mini Pavlovas?
Yes! To freeze, place the cooled Mini Pavlovas in a single layer in an airtight container, separating layers with parchment paper. They can be frozen for up to 1 month. When you’re ready to enjoy them, simply thaw at room temperature for about 30 minutes before adding your favorite toppings.
What should I do if my meringue is runny?
If your meringue isn’t forming stiff peaks, it may be due to overmixing or under-whipping. Make sure your mixing bowl and whisk are free from grease, and whip the egg whites until glossy with stiff peaks before gently folding in sugar. If it’s still runny, try adding a touch of cornstarch (about 1 teaspoon) during the mixing process to stabilize it.
Can I make Mini Pavlovas gluten-free?
Absolutely! The beauty of Mini Pavlovas is that they are naturally gluten-free since they contain no flour. Just ensure any toppings like whipped cream or fruit sauces are also gluten-free if you’re catering to dietary restrictions.
What fruits work best as toppings for Mini Pavlovas?
Fruits like fresh berries, kiwi, and passionfruit add a lovely tartness that complements the sweetness of meringue beautifully. For a tropical twist, consider mango or pineapple. Just remember to slice them just before serving to maintain freshness and prevent sogginess!

Mini Pavlovas
Ingredients
Method
- Preheat your oven to 250°F (120°C).
- Whip egg whites in a large bowl until stiff peaks form, about 5-7 minutes.
- Gradually add sugar, one tablespoon at a time, mixing until glossy and fully dissolved, about 5 minutes.
- Fold in cornstarch and vinegar gently with a spatula.
- Spoon the meringue mixture onto a baking sheet lined with parchment paper, creating small nests or rounds.
- Bake for 1 hour or until dry to the touch and pale in color. Let cool in the oven with the door slightly ajar.
- Prepare your favorite toppings while the pavlovas cool.
- Top with whipped cream and fresh berries or kiwi.
- Optional: Drizzle with chocolate sauce for an extra touch.