
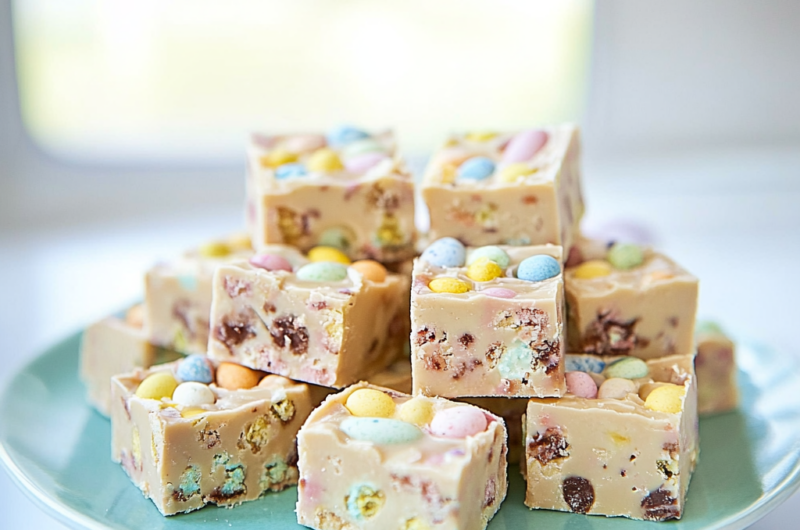
Have you ever found yourself craving a rich and creamy treat that’s as easy to prepare as it is delicious? Enter the No-Bake Easter Fudge—a delightful confection that combines the sweetness of chocolate with playful textures and vibrant colors. Picture smooth, velvety fudge studded with festive candies and topped with sprinkles; each bite melts in your mouth while delivering a rush of joy.
This indulgent dessert is not only incredibly simple to whip up but also perfect for sharing during Easter gatherings or family celebrations. Imagine creating this stunning treat in under an hour without turning on the oven. The combination of chocolate and colorful toppings adds a touch of whimsy that both kids and adults will adore. So gather your ingredients and get ready to impress your loved ones with this delightful No-Bake Easter Fudge!
Don’t miss this flavorful favorite!
Why You’ll Love This No-Bake Easter Fudge
- Quick and Easy: Minimal prep time and straightforward steps make this recipe stress-free, even for novice cooks
- Flavorful and Versatile: Enjoy outstanding flavor with ingredients you can easily customize by adding your favorites or adjusting spices
- Perfect for Any Occasion: Ideal for casual gatherings, holiday celebrations, or weeknight dinners

Ingredients for No-Bake Easter Fudge
Here’s what you’ll need to make this delicious dish:
- Sweetened Condensed Milk: This creamy base provides richness and sweetness while helping the fudge set properly.
- Chocolate Chips: Use semi-sweet or milk chocolate chips for a classic flavor; melting chocolate adds texture and taste.
- Butter: Unsalted butter enhances flavor without adding extra salt; it helps create a smooth consistency.
- Easter Candies: Colorful candies like mini eggs or jelly beans add fun visual appeal and extra sweetness.
- Sprinkles: Use festive sprinkles on top for added color and a celebratory feel.
The full ingredients list, including measurements, is provided in the recipe card directly below.
Explore another must-try dish!
How to Make No-Bake Easter Fudge
Follow these simple steps to prepare this delicious dish:
Step 1: Prepare Your Baking Dish
Line an 8×8-inch baking dish with parchment paper or foil, ensuring it hangs over the edges for easy removal later.
Step 2: Melt the Chocolate Mixture
In a medium saucepan over low heat, combine sweetened condensed milk, chocolate chips, and butter. Stir continuously until melted and smooth.
Step 3: Mix in Candies
Remove the saucepan from heat. Gently fold in half of your chosen Easter candies into the melted chocolate mixture until evenly distributed.
Step 4: Pour into Dish
Pour the fudge mixture into the prepared baking dish. Use a spatula to spread it evenly across the bottom of the dish.
Step 5: Top with Sprinkles
Sprinkle additional candies and sprinkles on top of the fudge before it sets. Press them lightly into the surface for better adhesion.
Step 6: Chill Until Firm
Refrigerate the fudge for at least two hours or until fully set. Once firm, lift it out using parchment paper or foil and cut into squares for serving.
Transfer to plates and enjoy this delightful treat during your next celebration!

Tips and Tricks
Here are some helpful tips to ensure the best results for your dish:
- Quality Ingredients: Use high-quality chocolate chips for enhanced flavor in your fudge.
- Chill Time: Allow enough time for chilling; this ensures proper setting so you can cut clean squares.
- Add Variety: Feel free to mix in nuts or dried fruit along with candies to create unique flavor combinations.
You might also love this tasty recipe!
How to Serve No-Bake Easter Fudge
This No-Bake Easter Fudge is versatile and pairs wonderfully with:
- Ice Cream: The creamy texture of ice cream complements the rich, sweet fudge perfectly, creating a delightful dessert experience.
- Fresh Fruits: Slices of strawberries or bananas add a fresh and fruity contrast that balances the sweetness of the fudge.
- Coffee or Tea: A warm beverage enhances the flavors of the fudge, providing a cozy and comforting treat after meals.
Feel free to pair it with your favorite sides for a personalized meal!

Make Ahead and Storage
- Make Ahead: You can prepare this No-Bake Easter Fudge up to three days in advance. Simply mix the ingredients as directed, pour into a lined baking dish, and refrigerate until firm. This allows the flavors to meld beautifully before serving.
- Storing: Store any leftover fudge in an airtight container at room temperature for up to one week. For longer storage, keep it in the fridge where it can last up to two weeks. Ensure it’s wrapped properly to prevent drying out.
- Reheating: If desired, you can slightly warm the fudge in the microwave at low power for about 10-15 seconds to soften it. Avoid overheating as this can change its texture and make it too sticky.
Looking for something similar? Check this out!
Suggestions for No-Bake Easter Fudge
Understand the Importance of Temperature
When making no-bake Easter fudge, temperature plays a crucial role in achieving the right consistency. If your ingredients are too warm, the fudge may not set properly and could end up being mushy. Conversely, if the mixture is too cold when you pour it into the pan, it might not incorporate well or mix thoroughly. Always ensure that your chocolate and other ingredients are at room temperature before mixing them together. This will help create a smooth texture that sets perfectly without any lumps.
Choose Quality Ingredients
Using high-quality ingredients can significantly impact the taste and texture of your no-bake Easter fudge. Opt for premium chocolate, as it provides a richer flavor compared to generic brands. Freshly sourced nuts or dried fruits can also add depth and enhance the overall experience. Avoid using low-quality substitutes that may contain artificial flavors or preservatives. Investing in quality ingredients ensures that your fudge is delicious and visually appealing, making it perfect for sharing during the Easter festivities.
Measure Ingredients Accurately
Accurate measurements are essential when preparing no-bake Easter fudge. Even a slight deviation in ingredient amounts can alter the final product’s texture and flavor. Use measuring cups and spoons to ensure precision, especially with sticky substances like peanut butter or syrup. Additionally, consider weighing your chocolate if possible; this method often yields better results than volume measurements alone. By measuring correctly, you can achieve a consistent fudge that delights everyone who tries it.
Allow Enough Cooling Time
After preparing your no-bake Easter fudge, allow sufficient cooling time before cutting it into pieces. Skipping this step can lead to uneven pieces that crumble easily instead of holding their shape. Ideally, let the fudge chill in the refrigerator for at least two hours or until fully set. If you’re in a hurry, you can place it in the freezer for about 30 minutes. However, make sure to keep an eye on it to prevent freezing solid, as this could affect its texture.

FAQs
What is No-Bake Easter Fudge?
No-bake Easter fudge is a delightful treat made without baking in an oven. It typically combines ingredients such as chocolate, sweetened condensed milk, and various mix-ins like nuts or candies to create a rich dessert that sets in the refrigerator instead of being baked. This recipe is perfect for families wanting to enjoy delicious treats during the Easter season without spending hours in the kitchen.
How long does No-Bake Easter Fudge last?
When stored properly in an airtight container, no-bake Easter fudge can last up to two weeks in the refrigerator. You can also freeze it for longer storage; just wrap individual pieces tightly in plastic wrap before placing them in a freezer bag to avoid freezer burn. When you’re ready to eat them, simply thaw at room temperature for an hour or so before enjoying their delightful taste.
Can I customize my No-Bake Easter Fudge?
Absolutely! One of the best aspects of no-bake Easter fudge is its versatility. You can easily customize your recipe by adding different types of chocolate—milk, dark, or white—or incorporating various mix-ins like crushed cookies, dried fruits, or colorful sprinkles for an extra festive touch. Feel free to get creative with flavors; adding peppermint extract or coconut can provide delightful variations that impress family and friends.
Is No-Bake Easter Fudge suitable for dietary restrictions?
Yes! You can adapt no-bake Easter fudge recipes to accommodate various dietary restrictions easily. For gluten-free options, use gluten-free cookies or omit them entirely while enhancing flavor with more nuts or seeds. If you’re looking for dairy-free alternatives, choose vegan chocolate and swap out regular butter with coconut oil or nut butter to achieve similar textures and tastes while keeping everyone satisfied.
Craving more delicious ideas? Try this next!
Conclusion for No-Bake Easter Fudge
No-bake Easter fudge offers an easy yet indulgent way to celebrate the holiday with loved ones. By understanding temperature control, choosing quality ingredients, measuring accurately, and allowing proper cooling time, you can create a dessert that truly shines during Spring celebrations. With its customizable nature and ability to cater to dietary needs, this treat is perfect for anyone looking to indulge without extensive effort in the kitchen. Whether shared at gatherings or enjoyed at home with family, this delicious fudge will surely become a favorite tradition year after year.
No-Bake Easter Fudge
- Total Time: 20 minutes
- Yield: Approximately 16 servings 1x
Description
No-Bake Easter Fudge is a delightful and indulgent treat that captures the spirit of spring celebrations. This rich, creamy fudge is made with simple ingredients, blending the sweetness of chocolate with colorful Easter candies for a visually appealing and delicious dessert. In under an hour, you can create this festive delight without turning on the oven—perfect for family gatherings or holiday festivities. Each bite melts in your mouth, delivering joy to both kids and adults alike. Make this No-Bake Easter Fudge a beloved tradition at your Easter celebrations!
Ingredients
- 1 can sweetened condensed milk
- 2 cups semi-sweet or milk chocolate chips
- 1/4 cup unsalted butter
- 1 cup assorted Easter candies (mini eggs, jelly beans)
- Festive sprinkles
Instructions
- Line an 8×8-inch baking dish with parchment paper.
- In a saucepan over low heat, combine sweetened condensed milk, chocolate chips, and butter. Stir until melted and smooth.
- Remove from heat and fold in half of the Easter candies.
- Pour the mixture into the prepared dish and spread it evenly.
- Top with remaining candies and sprinkles, pressing them lightly.
- Refrigerate for at least 2 hours until set. Cut into squares and serve.
Notes
For added texture, mix in nuts or dried fruits.
Use high-quality chocolate for richer flavor.
Allow enough chilling time to ensure clean cuts when serving.
- Prep Time: 15 minutes
- Cook Time: 5 minutes
- Category: Dessert
- Method: No-Bake
- Cuisine: American
Nutrition
- Serving Size: 1 serving
- Calories: 140
- Sugar: 14g
- Sodium: 25mg
- Fat: 8g
- Saturated Fat: 5g
- Unsaturated Fat: 3g
- Trans Fat: 0g
- Carbohydrates: 16g
- Fiber: 0g
- Protein: 2g
- Cholesterol: 10mg